
Umbraco has changed tremendously since I started working with it in version 4 back in 2013. In this series we are going to delve deep into Umbraco from the basics of creating your first site all the way to writing plugins and customizing the backend of this wonderful ASP.Net MVC based CMS.
Intended Audience
This blog series is targeted towards anyone interested in learning Umbraco. I'll be discussing topics from beginner to advanced, so there will definitely be something for everyone!
What you will need:
- ASP.Net MVC Experience
- C# Experience
- HTML5 Experience
- Javascript Experience
- Visual Studio 2015+
- Eagerness to learn about something cool!
- Coffee, Mountain Dew, Redbull, or some other caffeine delivery system 😆
What you don't need:
- Any Umbraco experience whatsoever.
What's New?
Just like v7, version 8 brings us even more exciting changes, mostly to the backend, but also to the code. If you’ve worked with Umbraco before, beware before you decide to upgrade. They’ve also changed the code and in many instances the reasoning isn’t immediately apparent. They’ve  even changed the spelling of methods, so it will most definitely break your code, even if you are upgrading from v7. It will undoubtedly break. It is most definitely worth starting a new project with v8, but if you are upgrading a large site just for the sake of it, be ready for some headaches. Get to It Already! Without further-adieu, here are some of the exciting changes Umbraco 8 has in store for you:
Backend UI Overhaul
The backend has changed considerably from v7. Not only did they change the colors, but they also moved the main navigation menu from the left so that you have more screen real estate to do what matters. One more important thing of note: If you’re looking for the developer menu, stop. They have merged it into the settings screen. You can now also adjust the size of the left navigation menu, making even more room for you to edit your content (or see those extra long document titles that were cut off in previous versions leaving you wondering what you were about to click on).
Infinite Editing
This is my favorite new feature and really speeds up development and content editing. No more are you writing content and realize that you need an image, so you have to stop what you’re doing, save, go to media, then find what you were editing and continue. It’s not just for media though, you can even add new properties to your document type without leaving the content editor. You just click the info tab, make whatever changes you need, click save and you’re right where you left off. Umbraco 8 means never losing context, or more importantly, your train of thought again!
Language Variants
Handling sites that are multi-lingual has become so much simpler in Umbraco v8. Your translators can now compare languages side by side once again providing you with the opportunity to write content and not be constantly distracted by clicking around multiple documents. For more information regarding language variants, please visit: https://umbraco.com/blog/umbraco-8-language-variants/
Content Apps
Content Apps, as its name implies are basically extensions added to your content node. This doesn’t mean that it is a direct part of your editing experience, it’s more of a companion. It can give you information or statistics on the content that you’ve written. I understand that from reading either this paragraph or even what Umbraco says about it, neither of us are doing it justice.
It's better to see an example:
See Preflight by Nathan Woulfe
If you want to learn more about content apps, check out the documentation.
Codebase Cleanup
This is something that must have taken a long time, which is why they say that version 8 was “5 years in the making.” I honestly have mixed opinions about this one, but I suppose it is something that had to happen, and we just have to grin and bear it. Now that I’ve deployed a couple of Umbraco 8 sites, I can say that it does seem cleaner and the code does make more sense, is better documented, and is much easier to extend than it was previously. If you have extended Umbraco in the past, you’ll see that a lot of the legacy code has been removed and they are using more modern technology. The process of writing packages is also much simpler than it used to be!
Your First Umbraco Site
Installation
Installing Umbraco is a breeze. It’s so simple you could probably train your dog to do it. There are a couple of ways to install Umbraco: 1) Download an archive from their website or B) Install a nuget package. I prefer the second way because I love how nuget keeps all my references in check, downloads them when they are missing, and well… it’s just nerdier that way. 😊
Step 1: You want to open Visual Studio and create an ASP.Net Web Application (.net framework). It is important that you select the empty template and add a reference to MVC. You don’t need to do anything else.
Step 2: Now you simply want to install the Umbraco nuget package.
To do that, we simply type the following into the Package Manager Console:
install-package UmbracoCms
Step 3: Now we simply run the solution and do the initial configuration.
Initial Configuration
- First you create the administrator account by filling out a simple form and then click customize.
- Click continue
- Next you select your database. Since this is a demo, I’m going to use SQL Server compact. Never use SQL Server compact for a production website.
- Click No thanks. I do not want to install a starter website. This is important because the rest of this article will teach you how to build your own website from scratch.
Putting It All Together
So, now you have installed an Umbraco solution, I’m sure you’re wondering what to do with it. In this section we shall do just that. I’ll walk you through writing the views and some basics of the Umbraco backend.
The Umbraco Back Office
The backend of Umbraco has been completely overhauled in this release and is much more intuitive.
Content
In this tab we will create, edit, and delete the content of your site possibly view the data contained in Content Apps. The content you will be maintaining will come from the Document Types created in the Settings section.
Media
This is simply where the media for your website is stored. Available media types are: File, Folder, Image, and Video. *NB: The exact allowable extensions are controlled in the ~/config/UmbracoSettings.config file.
Settings
This is without a doubt the most important tab in the interface. This is where most of a developer’s time will be spent. I’ll walk you through the more important subtabs. In much later articles, I’ll walk you through the rest.
Document Types are the bread and butter of your site. You can basically look at it like the definition of the pages (i.e. labels, textbox, rich textbox controls, etc) that will go on your site. Document Types may or may not have templates associated with them.
Templates in MVC terminology are just views and nothing more. They are written in regular Razor syntax & can reference the document type values associated with it.
Packages
You can basically think of packages as plugins for the back office.
Users
Users are the Administrators, Editors, Translators, or Writers of your site. This simply defines the user's level of access to the Umbraco backend.
Members
If your site uses authentication (outside of the back office), then here is were you can manage your members.
Forms
This is a paid extension from Umbraco that enables you or even your writers to create forms without coding. We won’t be focusing on this.
Building Our First Site
Now we are finally at the part we’ve all been waiting on. Now we will be creating our first document two types and a few templates. For this we will just be using a basic bootstrap 4.3.1 theme.
First things first, enter the following into your Package Manager Console:
install-package bootstrap
Now we're ready to rock and roll. Run the project in Visual Studio again and we will create our first document type and template.
First, we will be creating our home page type and template. When we create a second page, we’ll create a master template from which all others derive.
- Login to Umbraco
- Go to Settings
- Right Click on Document Types and Click Create.
- In the panel on the right type Homepage and select the icon you want for this page by clicking the box to the left.
- Now we’ll add a group. A group is simply a way of grouping your content fields (it could be something like Header, Body, Footer & then all the properties inside them). This site is going to be simple, so we’ll call our first group Content.
- Add the following properties and select the default settings for each:
- Site Title – Editor: Textbox – Click Submit.
- Site Name – Editor: Textbox – Click Submit.
- Hide Search – Editor: Checkbox – I think you know what to do.
- Header Text – Editor Textbox
- Header Content – Editor: Rich Text Editor
- Left Column Header – Editor Textbox
- Left Column Content – Editor Rich Text Editor
- Center Column Header – Editor Textbox
- Center Column Content – Editor Rich Text Editor
- Right Column Header – Editor Textbox
- Right Column Content – Editor Rich Text Editor
- Footer Content – Editor Rich Text Editor
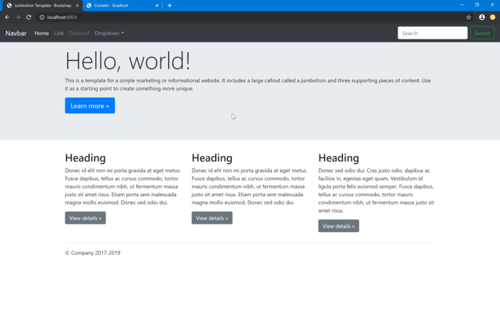
- For the homepage, we’re going to use the Jumbotron template from bootstrap 4. View source & copy all the source code from this page.
- Now click on Settings => Templates => Homepage & simply paste the HTML from the template.
- Change line 20 to:
<link href="~/Content/bootstrap.css" rel="stylesheet" crossorigin="anonymous">
- Delete line 117 & update 116 to the following:
<script src="~/Scripts/jquery-3.3.1.slim.js" crossorigin="anonymous"></script> - Update what is now line 117 to the following:
<script src="~/Scripts/bootstrap.bundle.js" crossorigin="anonymous"></script> - Also delete the following lines:
<!-- Custom styles for this template -->
Now we have our code all setup and ready to be displayed on the site. We just have to do a few things in the back office first.
<link href="jumbotron.css" rel="stylesheet"> - First, we need to tell where this new document type can go and potentially who can access it. To do that we go to Settings => Document Types => Homepage => Permissions (on top right) and turn the Allow as root slider to the on position.
Now we’re ready to add our first page to Umbraco. - Go to Content, Right Click the Content submenu, click create, then finally click Homepage.
 Name the page Home and click Save & Publish for the moment.
Now look at http://localhost:<random_port_number>/
Yay! We’re done!
Really?
Being the developer, do *you* want to make all the content changes? 😊
Now we must update the Homepage.cshtml view to grab the content data from Umbraco. So… go ahead and close that page and let’s get to it.- Go back to Visual Studio, click the “Show all files” button, go down to views, right click and select ‘Include in project.’ *NB: You could do this in the Umbraco interface also, but it isn’t a fun process, trust me.
- Open Homepage.cshtml
Notice how the @inherits line at the top doesn’t know what ContentModels.Homepage is. Many people think this is because Umbraco uses dynamic types, 🤢 but this simply isn’t true. Umbraco uses something called “Models Builder” that creates and updates the model when you update your pages and other things in the back office. Here I’ll show you: In Visual Studio make sure you’re showing all files. Right click ~/App_Data/Models/models.generated.cs & click include in project. Once you have done that, all of those red underlines will disappear and your Umbraco models will become visible and thus available to intellisense. This is a great little tip to make your coding easier. Note that your project will not run or build while this file is included in the project. When you’re ready to run your project, you must exclude this file again. Also, never manually edit this file because it will just be overwritten the next time you publish or build. - Now it’s time to make your content dynamic. To accomplish this, your finished code in HomePage.cshtml would look like the following:
Conclusion
We have just scratched the surface of the greatness that is Umbraco, particularly the latest & greatest version.
The full source code for this article can be found at: https://github.com/coderpros/blog/tree/master/CoderPro.Blog.Umb.Art1
The username & password to the back office is:
Username: info@coderpro.net
Password: Q1w2e3r4t5y6!
I hope this guide provided you with a useful introduction regarding the new version of Umbraco. If you have any questions or need any help with a technical project, please feel free to drop me a line anytime by using our contact form.
Coming Up Next Time
In our next lesson, you will learn how to make your Umbraco site do something besides just serve up content. You’ll accomplish this first with surface controllers and we will also learn about how to write modular and reusable code by using macros. Until then: Happy Coding!